How to set up Wake-on-LAN on Modem

Archer VR900 , Archer D2 , Archer D5 , TD-W8968 , Archer D9 , Archer D7 , TD-W9970 , TD-W8980 , TD-W9980 , TD-W8970
Recent updates may have expanded access to feature(s) discussed in this FAQ. Visit your product's support page, select the correct hardware version for your device, and check either the Datasheet or the firmware section for the latest improvements added to your product. Please note that product availability varies by region, and certain models may not be available in your region.
What is Wake-on-LAN?
Wake-on-LAN (WoL) is an Ethernet or Token ring computer networking standard that allows a computer to be turned on or awakened by a network message. The message is usually sent by a program executed on another computer on the same local area network. It is also possible to initiate the message from another network by using subnet directed broadcasts or a WOL gateway service.
Hardware requirements
The mainboard and wired network adapter must support Wake-on-LAN feature.
Software requirements
Wake On Lan Gui, Lan Helper, Magic Packet Utility, NetWaker for Windows. Here we take WakeOnLanGui as an example.
Set up steps:
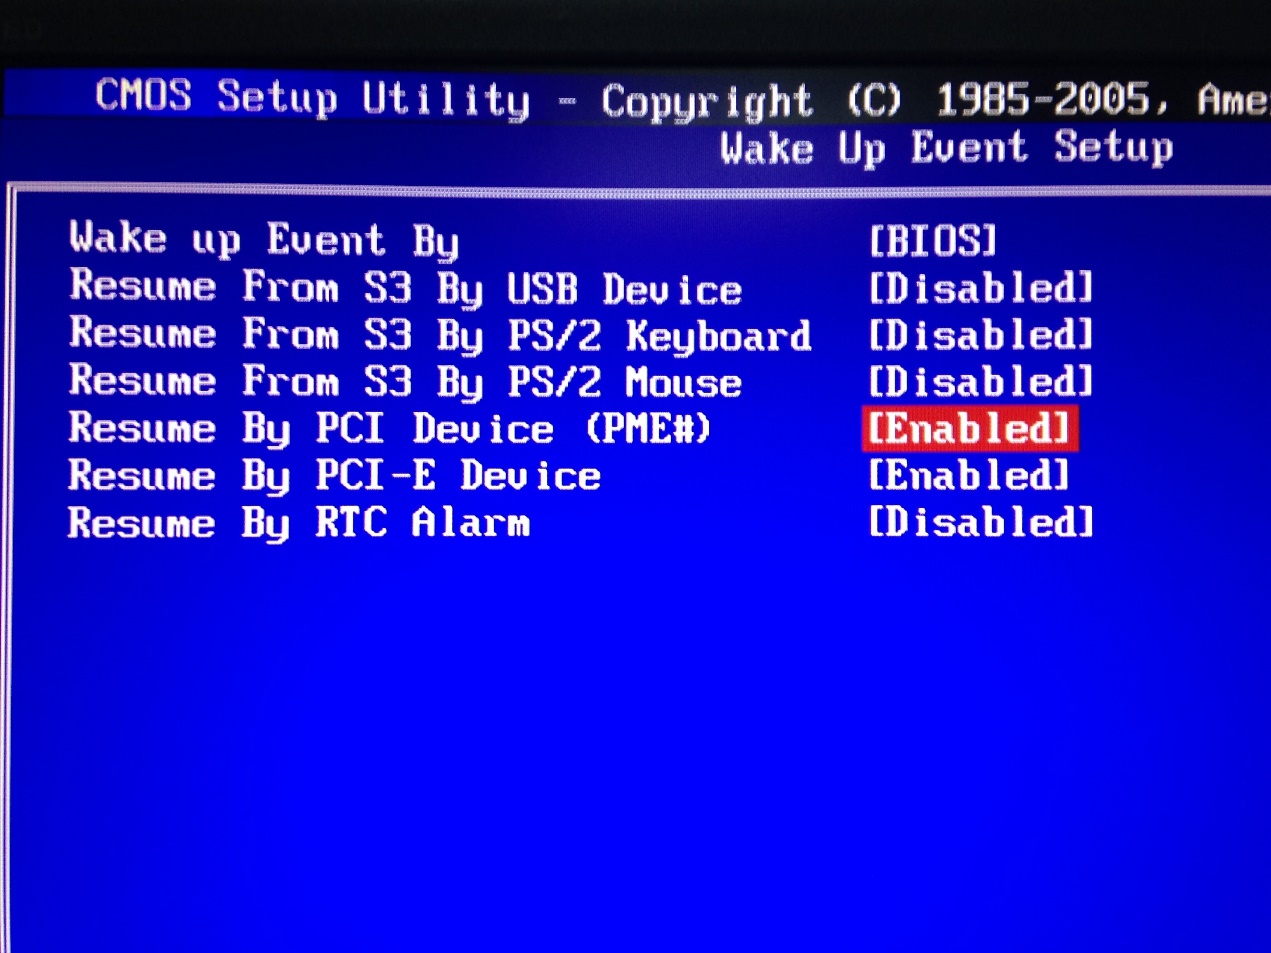
1. Enter BIOS when start up the computer. Then enable ‘Resume by PCI Device’ and ‘Resume by PCI-E Device’. Usually this option is in power management menu.
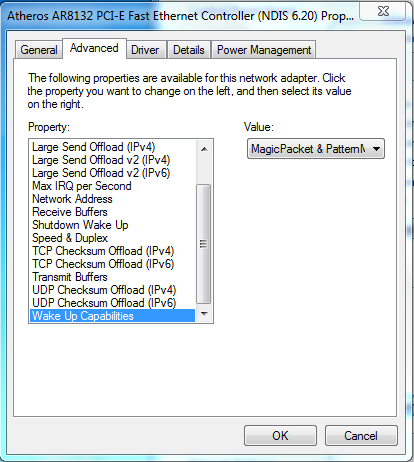
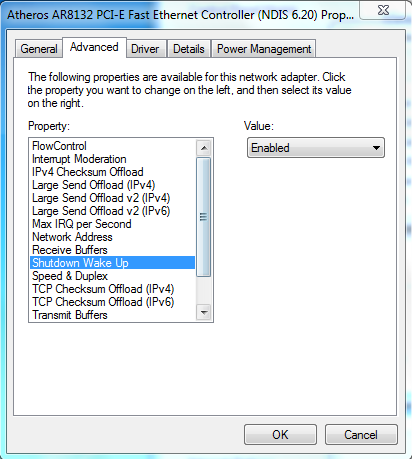
2. Turn on the computer and go to Control Panel--Network and Internet--Network and Sharing Center--Local area connection--Properties--Configure--Advanced. Then Enable ShutDown Wake Up and set Wake Up Capabilities to Magic Packets.
After the settings are done on the computer, we need to do some setting on our Router.
Wake up a PC on LAN side
1. Check MAC address and IP address of the computer need Wake-on-LAN. We call it PC 1 here.
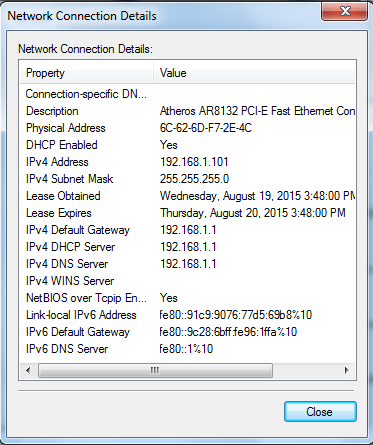
2. Set IP&MAC binding of PC 1 on our router.
Classic Web UI
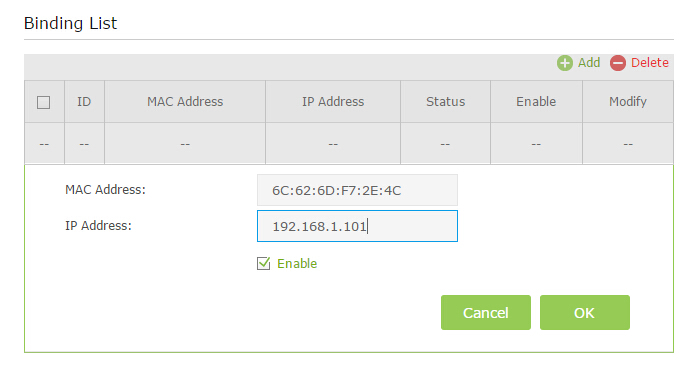
New Web UI
3. Set Address reservation for PC 1 on our router.
Classic Web UI
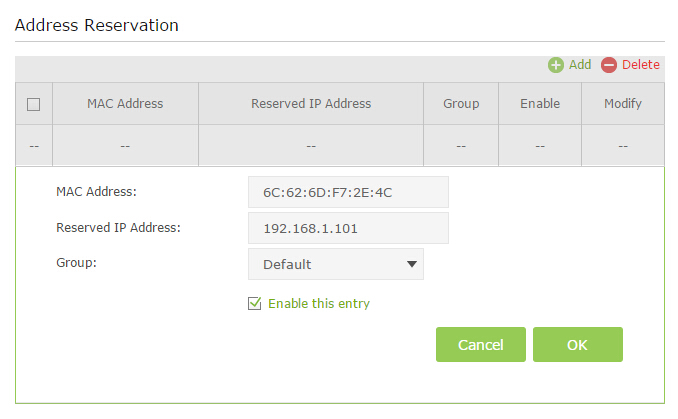
New Web UI
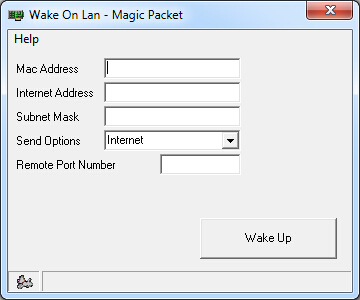
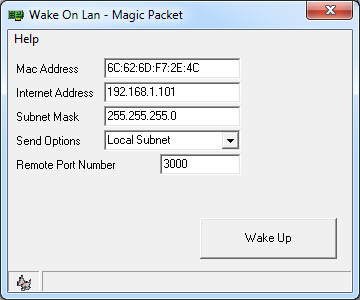
4. Run Wake On Lan GUI software on another PC in the same LAN. Then fill in the information. Port number is unnecessary if we wake up on Local Subnet. You can fill a random number from 1-65535.Then click Wake Up and you can see PC 1 will start up.
Wake up a PC on the WAN side
The first 3 steps are the same as above.
4. We need to open a port for PC 1 use Virtual Server. Here we open port number 3000.
Classic Web UI
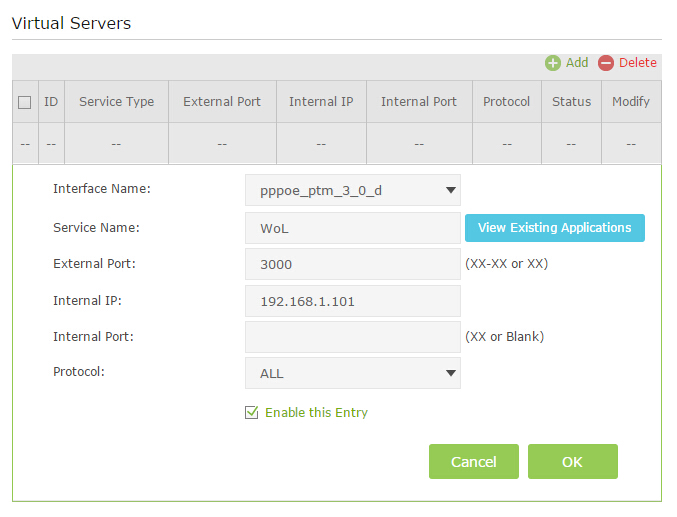
New Web UI
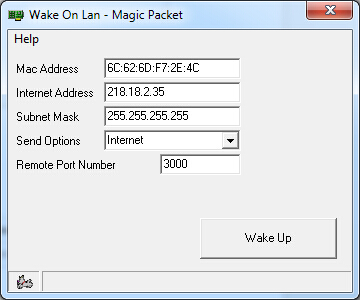
5. Now we check the WAN IP address of the Router PC 1 connected. Here the WAN IP is 218.18.2.35.
6. Run Wake On Lan GUI software on a PC from WAN side. Then fill in the information like below and click Wake Up. You can see PC 1 will start up after you click it.
Câu hỏi thường gặp này có hữu ích không?
Phản hồi của bạn giúp cải thiện trang web này.
Mối quan tâm của bạn với bài viết này là gì?
- Không hài lòng với sản phẩm
- Quá phức tạp
- Tiêu đề khó hiểu
- Không áp dụng cho tôi
- Quá mơ hồ
- Khác
Cảm ơn
Chúng tôi đánh giá cao phản hồi của bạn.
Nhấp vàođây để liên hệ với bộ phận hỗ trợ kỹ thuật của TP-Link.
Recommend Products
This website uses cookies to improve website navigation, analyze online activities and have the best possible user experience on our website. You can object to the use of cookies at any time. You can find more information in our privacy policy . Don’t show again
Basic Cookies
Những cookie này cần thiết để trang web hoạt động và không thể tắt trong hệ thống của bạn.
TP-Link
accepted_local_switcher, tp_privacy_base, tp_privacy_marketing, tp_smb-select-product_scence, tp_smb-select-product_scenceSimple, tp_smb-select-product_userChoice, tp_smb-select-product_userChoiceSimple, tp_smb-select-product_userInfo, tp_smb-select-product_userInfoSimple, tp_top-banner, tp_popup-bottom, tp_popup-center, tp_popup-right-middle, tp_popup-right-bottom, tp_productCategoryType
Livechat
__livechat, __lc2_cid, __lc2_cst, __lc_cid, __lc_cst, CASID
Youtube
id, VISITOR_INFO1_LIVE, LOGIN_INFO, SIDCC, SAPISID, APISID, SSID, SID, YSC, __Secure-1PSID, __Secure-1PAPISID, __Secure-1PSIDCC, __Secure-3PSID, __Secure-3PAPISID, __Secure-3PSIDCC, 1P_JAR, AEC, NID, OTZ
Analysis and Marketing Cookies
Cookie phân tích cho phép chúng tôi phân tích các hoạt động của bạn trên trang web của chúng tôi nhằm cải thiện và điều chỉnh chức năng trang web của chúng tôi.
Các cookie tiếp thị có thể được các đối tác quảng cáo của chúng tôi thiết lập thông qua trang web của chúng tôi để tạo hồ sơ về sở thích của bạn và hiển thị cho bạn các quảng cáo có liên quan trên các trang web khác.
Google Analytics & Google Tag Manager
_gid, _ga_<container-id>, _ga, _gat_gtag_<container-id>
Google Ads & DoubleClick
test_cookie, _gcl_au
Meta Pixel
_fbp
Crazy Egg
cebsp_, _ce.s, _ce.clock_data, _ce.clock_event, cebs
lidc, AnalyticsSyncHistory, UserMatchHistory, bcookie, li_sugr, ln_or