How to Configure Management VLAN on TP-Link Smart and Managed Switches Using the New GUI

TL-SG3452X , SG2428LP , TL-SG3452XP , SX3008F , SG3428MP , SG3428X , SX3016F , TL-SG2210P , SG2428P , SG3452XP , SG2210MP , TL-SX3008F , TL-SL2428P , TL-SG3428 , TL-SG2218 , SG2210P , TL-SX3016F , S4500-8G , SG2218 , SG3428 , TL-SG3428X , S5500-4XHPP2XF , S5500-8MHP2XF , SL2428P , TL-SG3428X-M2 , TL-SG3428MP , S4500-8GHP2F , TL-SG2008 , S4500-16G2F , TL-SG3428XF , TL-SG2210MP , TL-SG3210 , TL-SG3452 , SG3428X-M2 , SG3210 , SG3452 , SG3452X , Festa FS310GP , TL-SX3206HPP , TL-SG3210XHP-M2 , S5500-24GP4XF , SG3428XMP , TL-SG2428P , TL-SG3428XMP , SX3206HPP , T3700G-28TQ , SG3428XF
Recent updates may have expanded access to feature(s) discussed in this FAQ. Visit your product's support page, select the correct hardware version for your device, and check either the Datasheet or the firmware section for the latest improvements added to your product. Please note that product availability varies by region, and certain models may not be available in your region.
Introduction
Management VLAN provides a safer method to manage the switch. With management VLAN configured, only the hosts in the management VLAN can access switches’ GUI.
Network Requirements
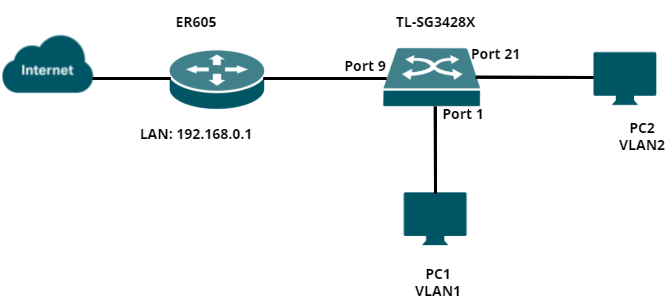
As the following topology shows, PC1 and PC2 are connected to port 1 and port 21 of the switch. The switch (TL-SG3428X) is connected to the internet via a router through port 9. The IP address of the switch is 192.168.0.100, which is assigned by the router (ER605). In this example, we will configure management VLAN to only allow the hosts in VLAN2 to access the GUI of the switch.
Configuration Overview
1. Create a VLAN interface on the router
2. Create the corresponding VLAN on the switch
3. Create an access control rule
4. Verification
Configuration Steps
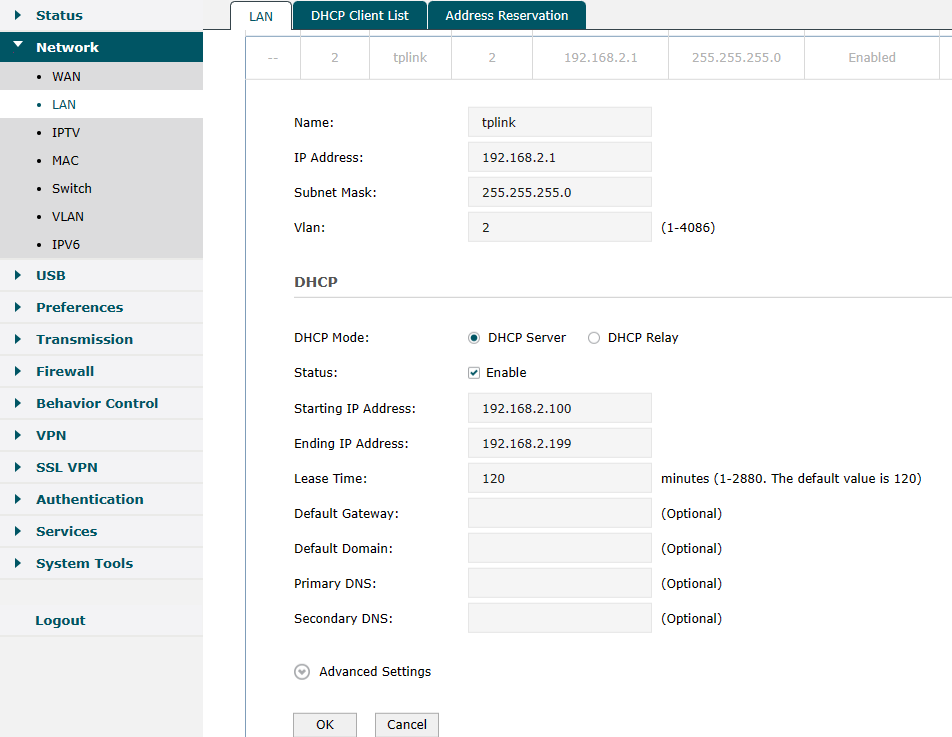
Step 1. Log in to the router’s GUI and navigate to Network → LAN to add a new VLAN interface — VLAN 2.
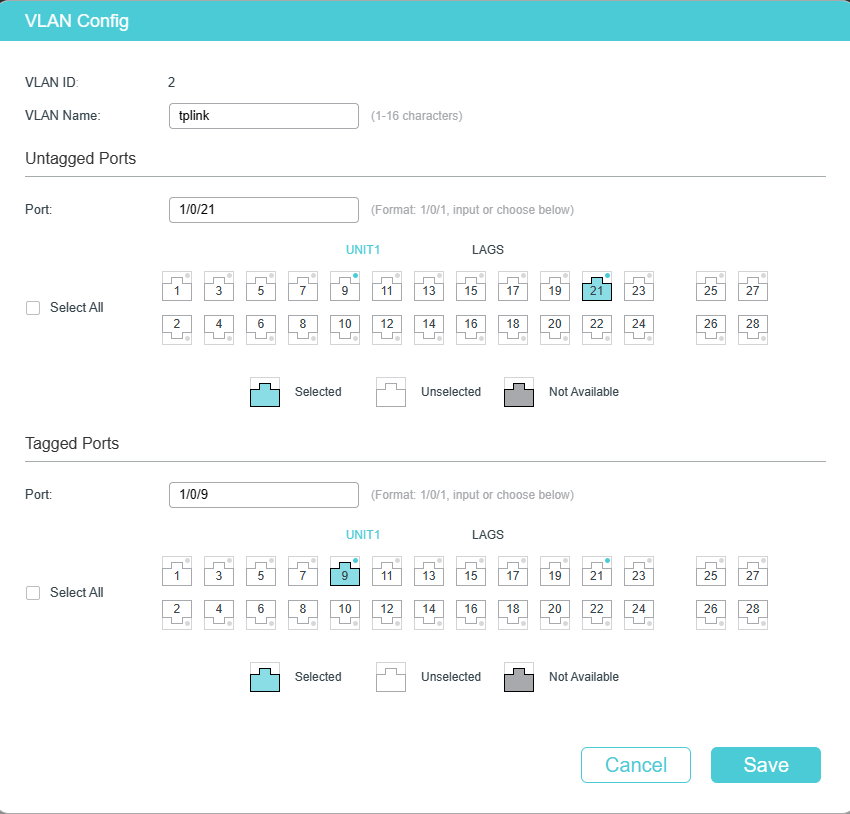
Step 2. Log in to the GUI of the switch and navigate to L2 Features → VLAN → 802.1Q VLAN → VLAN Config to add a new entry for VLAN — VLAN2. The uplink port of the switch should be tagged.
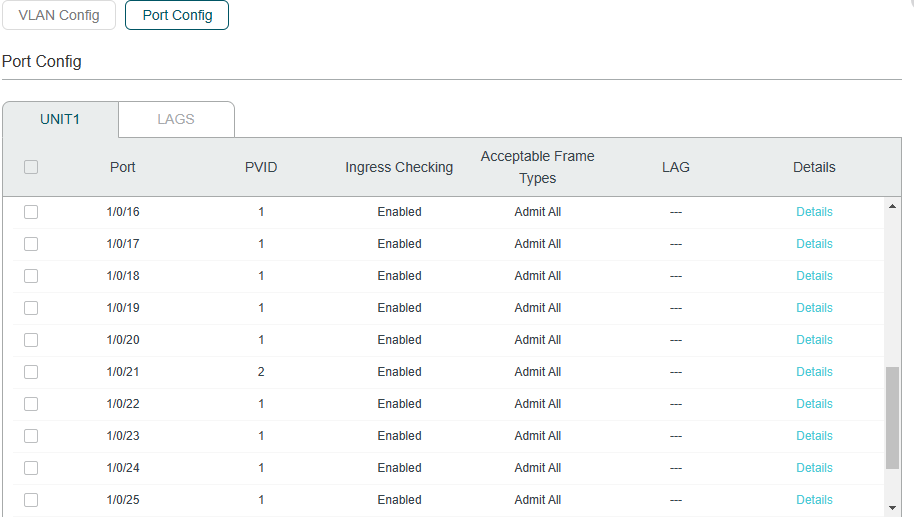
Then navigate to Port Config and change the PVID of Port 21 to 2.
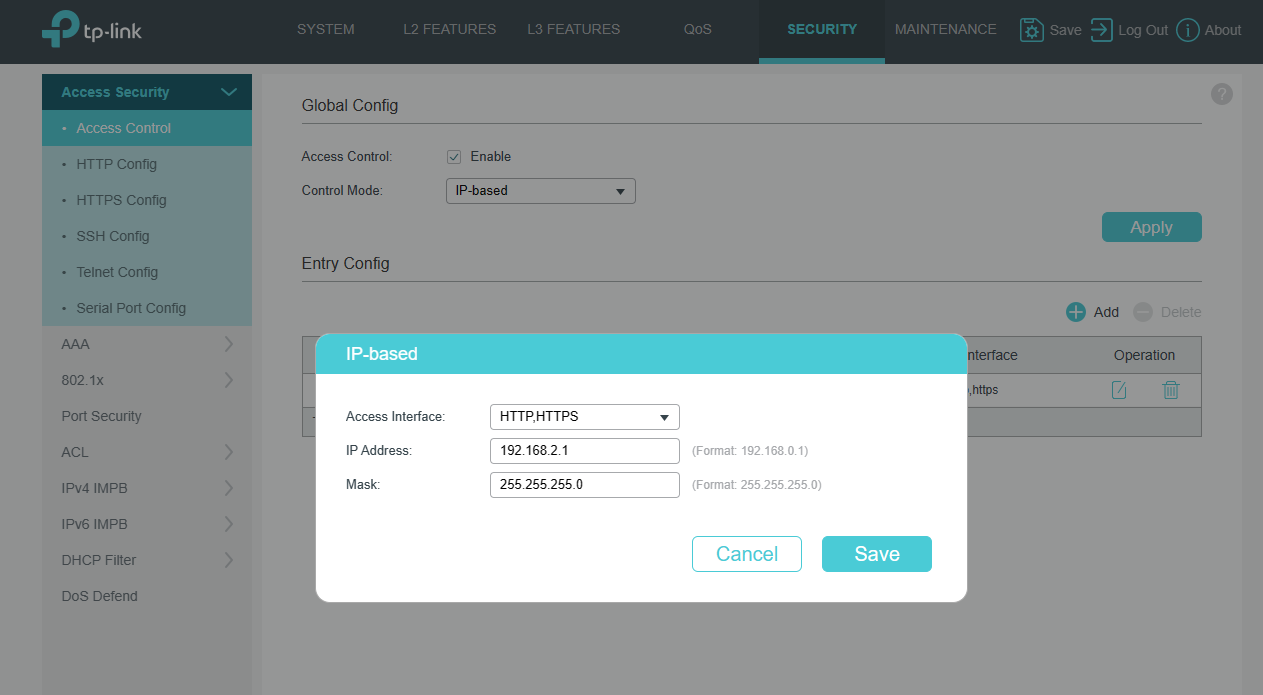
Step 3. Navigate to Security → Access Security → Access control to create an IP-based ACL (Access Control List).
Specify the Access interface as HTTP and HTTPS, and only allow devices in 192.168.2.1/24 to access the GUI of switch.
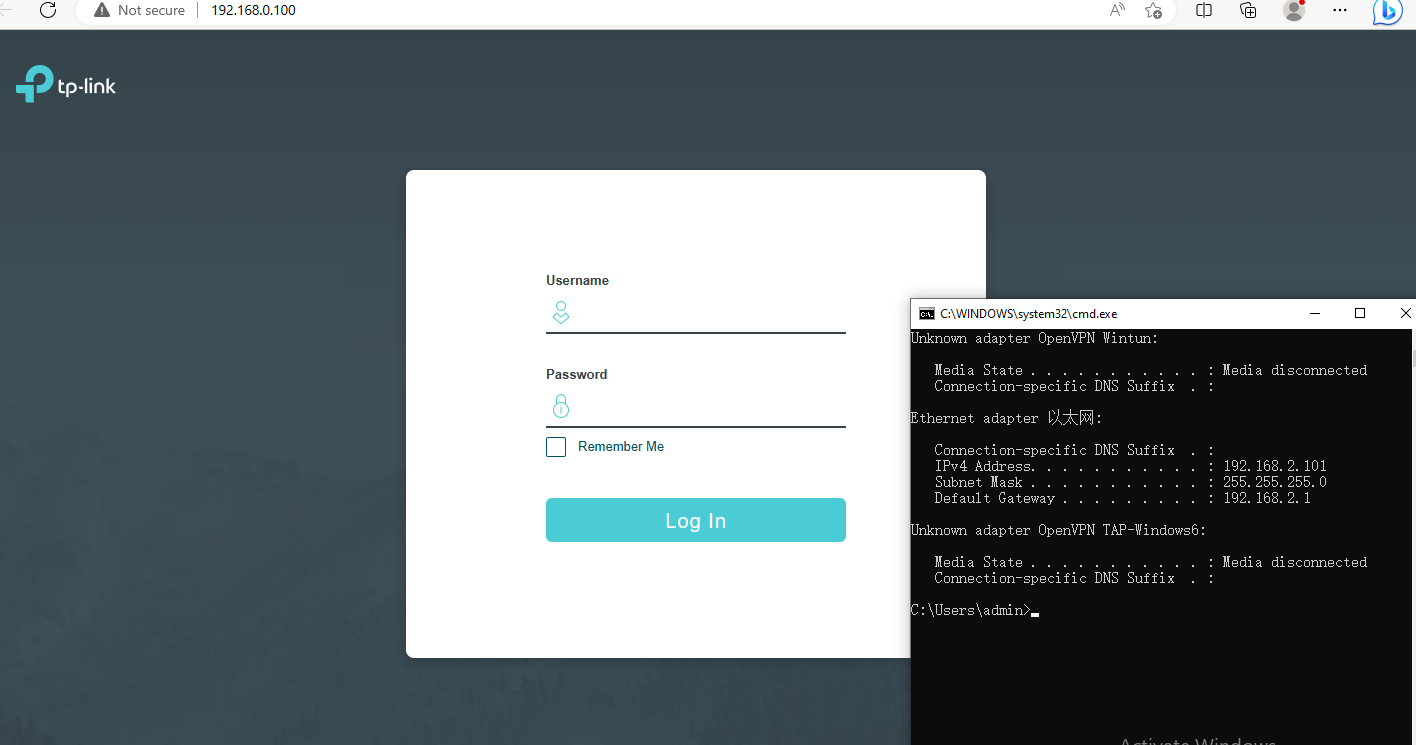
Step 4. Verification
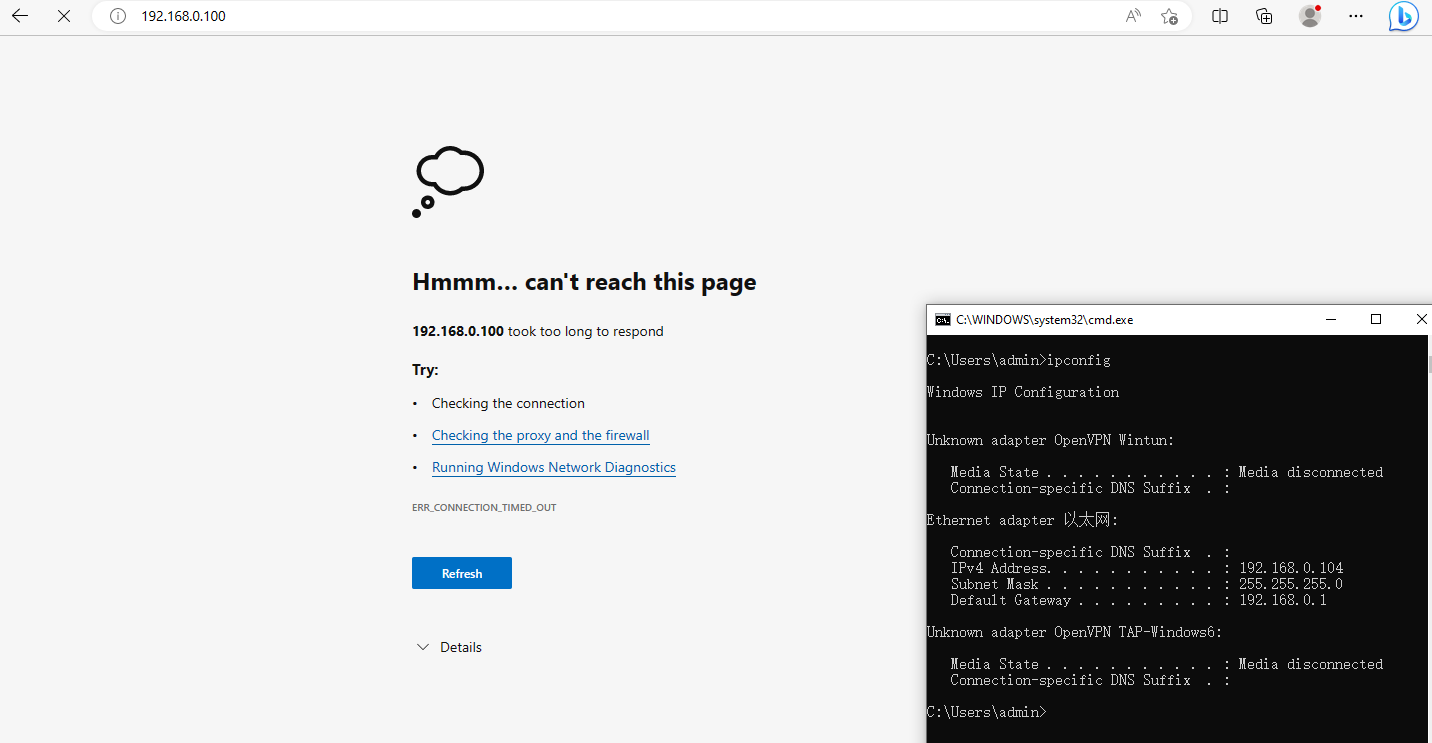
Lastly, you can verify whether the settings have been successfully applied. For example: PC2 in VLAN2 can access 192.168.0.100; however, PC1 cannot.
Câu hỏi thường gặp này có hữu ích không?
Phản hồi của bạn giúp cải thiện trang web này.
Mối quan tâm của bạn với bài viết này là gì?
- Không hài lòng với sản phẩm
- Quá phức tạp
- Tiêu đề khó hiểu
- Không áp dụng cho tôi
- Quá mơ hồ
- Khác
Cảm ơn
Chúng tôi đánh giá cao phản hồi của bạn.
Nhấp vàođây để liên hệ với bộ phận hỗ trợ kỹ thuật của TP-Link.
This website uses cookies to improve website navigation, analyze online activities and have the best possible user experience on our website. You can object to the use of cookies at any time. You can find more information in our privacy policy . Don’t show again
Basic Cookies
Những cookie này cần thiết để trang web hoạt động và không thể tắt trong hệ thống của bạn.
TP-Link
accepted_local_switcher, tp_privacy_base, tp_privacy_marketing, tp_smb-select-product_scence, tp_smb-select-product_scenceSimple, tp_smb-select-product_userChoice, tp_smb-select-product_userChoiceSimple, tp_smb-select-product_userInfo, tp_smb-select-product_userInfoSimple, tp_top-banner, tp_popup-bottom, tp_popup-center, tp_popup-right-middle, tp_popup-right-bottom, tp_productCategoryType
Livechat
__livechat, __lc2_cid, __lc2_cst, __lc_cid, __lc_cst, CASID
Youtube
id, VISITOR_INFO1_LIVE, LOGIN_INFO, SIDCC, SAPISID, APISID, SSID, SID, YSC, __Secure-1PSID, __Secure-1PAPISID, __Secure-1PSIDCC, __Secure-3PSID, __Secure-3PAPISID, __Secure-3PSIDCC, 1P_JAR, AEC, NID, OTZ
Analysis and Marketing Cookies
Cookie phân tích cho phép chúng tôi phân tích các hoạt động của bạn trên trang web của chúng tôi nhằm cải thiện và điều chỉnh chức năng trang web của chúng tôi.
Các cookie tiếp thị có thể được các đối tác quảng cáo của chúng tôi thiết lập thông qua trang web của chúng tôi để tạo hồ sơ về sở thích của bạn và hiển thị cho bạn các quảng cáo có liên quan trên các trang web khác.
Google Analytics & Google Tag Manager
_gid, _ga_<container-id>, _ga, _gat_gtag_<container-id>
Google Ads & DoubleClick
test_cookie, _gcl_au
Meta Pixel
_fbp
Crazy Egg
cebsp_, _ce.s, _ce.clock_data, _ce.clock_event, cebs
lidc, AnalyticsSyncHistory, UserMatchHistory, bcookie, li_sugr, ln_or