How to add a device to the network using tpPLC Utility (new logo)

TL-WPA4220 , TL-WPA7519 KIT , TL-WPA8730 KIT , TL-WPA4220KIT , TL-PA7020 KIT , TL-PA9020 KIT , TL-WPA8630P KIT , TL-WPA7510 KIT , TL-PA8015P KIT , TL-WPA4226 KIT , TL-PA7020P KIT(FR) , TL-PA4015PT KIT , TL-PA7020P KIT , TL-PA8010 KIT , TL-PA4010P TKIT , TL-PA4010P KIT , TL-WPA7617 , TL-PA8035P , TL-WPA7617 KIT , TL-PA9020P KIT , TL-PA7027P KIT , TL-WPA4226T KIT , TL-WPA7619 KIT , TL-WPA4220 KIT , TL-WPA8635P KIT , TL-PA7010 KIT , TL-PA8010P KIT , TL-PA7010P KIT(FR) , TL-WPA4235P KIT , TL-WPA9610 KIT , TL-PA7017P KIT , TL-PA4015PKIT , TL-PA4020PT KIT , TL-PA7017 KIT , TL-WPA4221 KIT , TL-PA9025P KIT , TL-PA4020P KIT , TL-PA4015P , TL-PA9025P , TL-WPA8631P , TL-WPA7517 , TL-WPA8630 KIT , TL-WPA8630 KIT(FR)( V1 V2 ) , TL-PA8035P KIT , TL-PA717 KIT( V4 ) , TL-WPA4230P KIT , TL-PA4025P KIT , TL-WPA4227KIT( V1 ) , TL-PA4022P KIT( V3 ) , TL-PA7010P KIT , TL-WPA1300P KIT , TL-PA4010 KIT , TL-WPA8635P( V2 ) , TL-PA4016P KIT , TL-PA411KIT( V3 V4 ) , TL-WPA4530 KIT , TL-WPA8631P KIT , TL-WPA8630P( V2 V2.10 ) , TL-WPA4220 TKIT , TL-WPA7817 KIT , TL-PA4010 , TL-PA8033P KIT( V2 ) , TL-WPA4225 KIT , TL-PA8030P KIT , TL-PA711 KIT( V3 ) , TL-PA8010P , TL-WPA7517 KIT
Recent updates may have expanded access to feature(s) discussed in this FAQ. Visit your product's support page, select the correct hardware version for your device, and check either the Datasheet or the firmware section for the latest improvements added to your product. Please note that product availability varies by region, and certain models may not be available in your region.
To add a device to the current network, follow the steps below:
1. Write down the 16-digit powerline key printed on the device label.
2. Plug the device into a wall socket and wait until its LEDs become stable.
3. Open the utility, and click Add Device on the left column.
Please note: If the Utility hasn’t been installed yet, please refer to How to prepare for using the tpPLC Utility (new logo)?
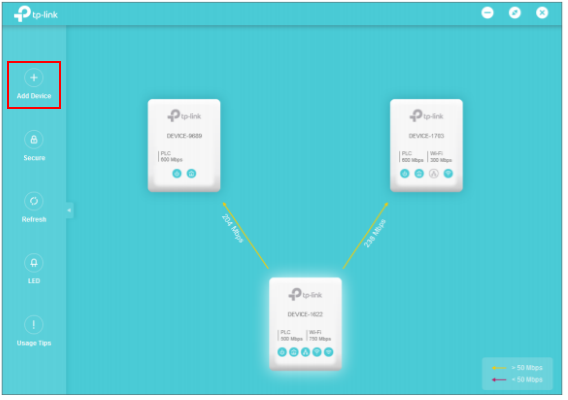
4. On the Add a New Device page, enter the powerline key you wrote down, and click Save.
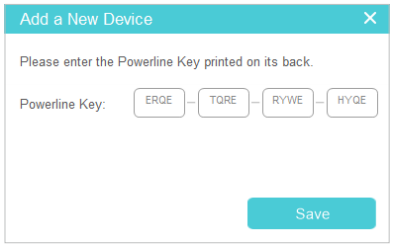
Now the new device will appear on the utility.
Get to know more details of each function and configuration please go to Download Center to download the manual of your product.
Related FAQs
- Làm thế nào để bảo mật (ghép nối) Mạng Đường Dây Điện (Powerline)?
- Tôi có thể làm gì khi tôi không thể kết nối Internet sau khi đã kết nối với bộ chuyển đổi đường dây điện?
- How to add an extra Powerline AC extender to the existing Powerline AC wireless network by Pair button
- How to set a new powerline network name using tpPLC Utility
- How to add a device using the tpPLC App (Smartphone)
Câu hỏi thường gặp này có hữu ích không?
Phản hồi của bạn giúp cải thiện trang web này.
Mối quan tâm của bạn với bài viết này là gì?
- Không hài lòng với sản phẩm
- Quá phức tạp
- Tiêu đề khó hiểu
- Không áp dụng cho tôi
- Quá mơ hồ
- Khác
Cảm ơn
Chúng tôi đánh giá cao phản hồi của bạn.
Nhấp vàođây để liên hệ với bộ phận hỗ trợ kỹ thuật của TP-Link.
Sản phẩm khuyến nghị
This website uses cookies to improve website navigation, analyze online activities and have the best possible user experience on our website. You can object to the use of cookies at any time. You can find more information in our privacy policy . Don’t show again
Basic Cookies
Những cookie này cần thiết để trang web hoạt động và không thể tắt trong hệ thống của bạn.
TP-Link
accepted_local_switcher, tp_privacy_base, tp_privacy_marketing, tp_smb-select-product_scence, tp_smb-select-product_scenceSimple, tp_smb-select-product_userChoice, tp_smb-select-product_userChoiceSimple, tp_smb-select-product_userInfo, tp_smb-select-product_userInfoSimple, tp_top-banner, tp_popup-bottom, tp_popup-center, tp_popup-right-middle, tp_popup-right-bottom, tp_productCategoryType
Livechat
__livechat, __lc2_cid, __lc2_cst, __lc_cid, __lc_cst, CASID
Youtube
id, VISITOR_INFO1_LIVE, LOGIN_INFO, SIDCC, SAPISID, APISID, SSID, SID, YSC, __Secure-1PSID, __Secure-1PAPISID, __Secure-1PSIDCC, __Secure-3PSID, __Secure-3PAPISID, __Secure-3PSIDCC, 1P_JAR, AEC, NID, OTZ
Analysis and Marketing Cookies
Cookie phân tích cho phép chúng tôi phân tích các hoạt động của bạn trên trang web của chúng tôi nhằm cải thiện và điều chỉnh chức năng trang web của chúng tôi.
Các cookie tiếp thị có thể được các đối tác quảng cáo của chúng tôi thiết lập thông qua trang web của chúng tôi để tạo hồ sơ về sở thích của bạn và hiển thị cho bạn các quảng cáo có liên quan trên các trang web khác.
Google Analytics & Google Tag Manager
_gid, _ga_<container-id>, _ga, _gat_gtag_<container-id>
Google Ads & DoubleClick
test_cookie, _gcl_au
Meta Pixel
_fbp
Crazy Egg
cebsp_, _ce.s, _ce.clock_data, _ce.clock_event, cebs
lidc, AnalyticsSyncHistory, UserMatchHistory, bcookie, li_sugr, ln_or