How to Waterproof VIGI Outdoor Security Cameras

VIGI C340S , VIGI C540V , VIGI C540S , VIGI C250 , VIGI C540-W , VIGI C230 , VIGI C350 , VIGI C300P , VIGI C330 , VIGI C355 , VIGI C330I , VIGI C320I , VIGI C340I , VIGI C230I Mini , EasyCam C320 , VIGI C300HP , VIGI C340 , VIGI C240 , VIGI C340-W , VIGI C540 , VIGI C485 , VIGI C385 , VIGI C220I , VIGI C230I , VIGI C240I
Recent updates may have expanded access to feature(s) discussed in this FAQ. Visit your product's support page, select the correct hardware version for your device, and check either the Datasheet or the firmware section for the latest improvements added to your product. Please note that product availability varies by region, and certain models may not be available in your region.
When the camera is installed outdoors, please install waterproof items to waterproof your VIGI outdoor security cameras. Make sure each part is securely attached and the water-proofing rings are flush to keep out water.
Step 1: Install Waterproof Cable Attachments
Install the waterproof cable attachments for the network interface when the camera is installed outdoors.
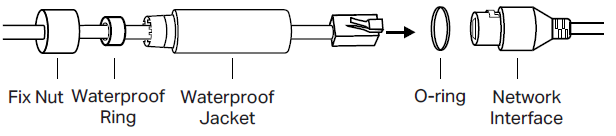
- Route the network cable through the following components in order: fix nut, waterproof ring, and then the waterproof jacket.
- Insert the waterproof ring into the waterproof jacket.
- Fix the O-ring to the network interface of the camera and connect the network cables.
- Attach the network interface with the waterproof jacket, then twist to lock. Rotate the fix nut to secure it to the waterproof jacket.
Done! The network interface is now waterproof.
Step 2: Install Waterproof Seal for Power Connectors
Install the waterproof seal for the power connectors when the camera is installed outdoors.
To get to know more details of each function and configuration, please go to Download Center to download the manual of your product.
¿Es útil esta pregunta frecuente?
Sus comentarios nos ayudan a mejorar este sitio.
¿Cuál es tu preocupación con este artículo?
- Insatisfecho con el producto
- Muy complicado
- Titulo confuso
- Eso no aplica a mi
- Demasiado vago
- Otro
Gracias
Agradecemos sus comentarios.
Haga clic aquí para comunicarse con el soporte técnico de TP-Link.
Este sitio utiliza cookies. Si continúa navegando por el sitio, acepta el uso que hacemos de las cookies. No volver a mostrar Más información .
Cookies basicas
TP-Link
accepted_local_switcher, tp_privacy_base, tp_privacy_marketing, tp_smb-select-product_scence, tp_smb-select-product_scenceSimple, tp_smb-select-product_userChoice, tp_smb-select-product_userChoiceSimple, tp_smb-select-product_userInfo, tp_smb-select-product_userInfoSimple, tp_top-banner, tp_popup-bottom, tp_popup-center, tp_popup-right-middle, tp_popup-right-bottom, tp_productCategoryType
Chat en vivo
__livechat, __lc2_cid, __lc2_cst, __lc_cid, __lc_cst, CASID
Youtube
id, VISITOR_INFO1_LIVE, LOGIN_INFO, SIDCC, SAPISID, APISID, SSID, SID, YSC, __Secure-1PSID, __Secure-1PAPISID, __Secure-1PSIDCC, __Secure-3PSID, __Secure-3PAPISID, __Secure-3PSIDCC, 1P_JAR, AEC, NID, OTZ
Cookies de análisis y marketing
Las cookies de análisis nos permiten analizar sus actividades en nuestro sitio web para mejorar y adaptar la funcionalidad de nuestro sitio web.
Nuestros socios publicitarios pueden configurar las cookies de marketing a través de nuestro sitio web para crear un perfil de sus intereses y mostrarle anuncios relevantes en otros sitios web.
Google Analytics y Google Tag Manager
_gid, _ga_<container-id>, _ga, _gat_gtag_<container-id>
Google Ads y DoubleClick
test_cookie, _gcl_au
Meta Pixel
_fbp
Crazy Egg
cebsp_, _ce.s, _ce.clock_data, _ce.clock_event, cebs
lidc, AnalyticsSyncHistory, UserMatchHistory, bcookie, li_sugr, ln_or