How to Connect a TP-Link Router to StarLink Internet
this FAQ is designed to help you in connecting and configuring your TP-Link Router to work with StarLink Internet service. Please be aware that StarLink has launched two generations of hardware for home users. The Gen-1 Terminal (Round Dish) and the Gen-2 Terminal (Rectangular Dish). The main difference between the two versions is the removal of the Ethernet Jack. Please Use The Diagram Below to Determine the Version.
*With a Gen-2 Terminal, you must purchase an Ethernet Adapter from StarLink to Connect to the TP-Link router.
Setup for StarLink Gen 1 - Ethernet Adapter Included
The Original Terminal is a Round Dish with an Ethernet Jack. However, the original StarLink Router that comes with your system does not support Bypass Mode, so you must unplug the StarLink router if you want the TP-Link Router to work as the main Router. Please configure your network as follows:
Step 1:
Unplug The StarLink Router by Disconnecting the Cable Connected to the Power Supply
Step 2:
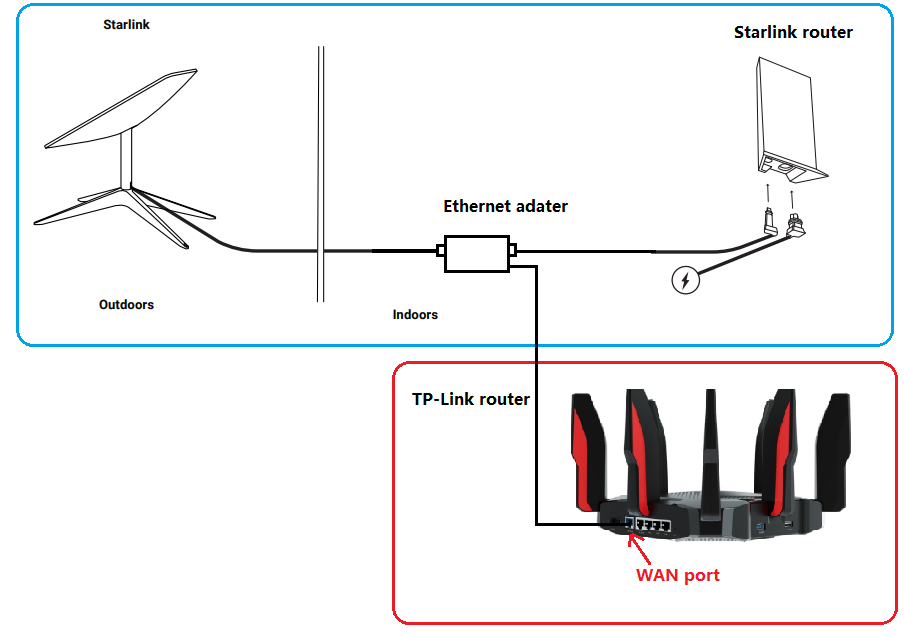
Plug the StarLink PoE Adapter into the WAN port of the TP-Link Router
*Your Setup Should Be Similar to That of the Image Below:

Setup For StarLink Gen 2 - Ethernet Adapter Purchased Separately
Unlike the Original StarLink Terminal, the Dish is Rectangular, and no PoE adapter is included. With a Gen-2 Terminal, you must purchase an Ethernet Adapter from StarLink to Connect to the TP-Link router.
After Connecting the StarLink Terminal to the StarLink Router:
Step 1:
Connect the TP-Link Router’s WAN Port to the StarLink Ethernet Adapter

Step 2:
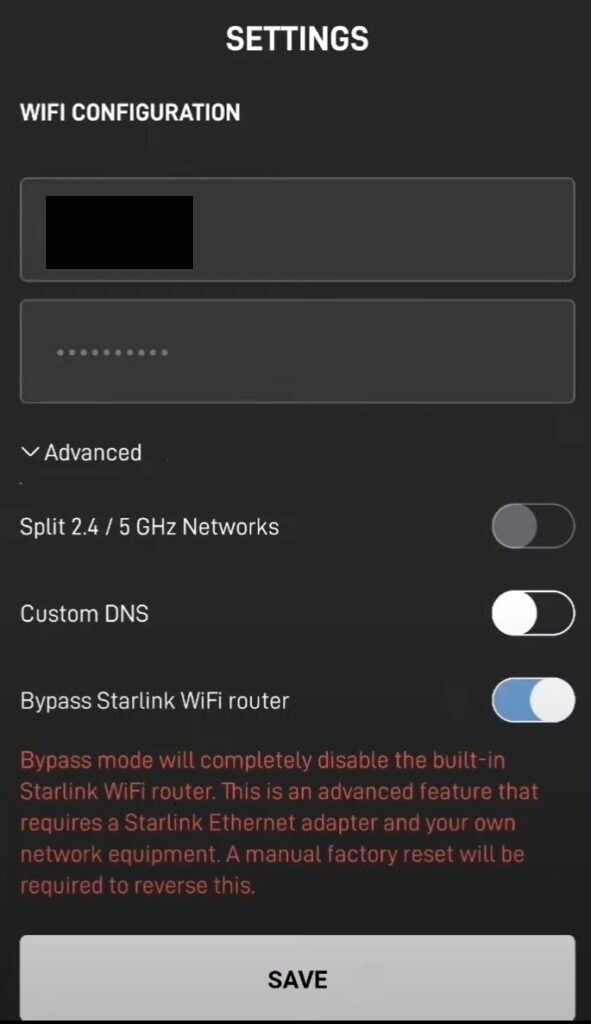
If you would like the TP-Link Router to be the main Router for the network, you can enable “Bypass Mode on the StarLink Gen-2 Via the StarLink Application.

*When enabling Bypass Mode, All Wireless Features will be disabled on the StarLink Terminal. A factory reset is required if you want to switch back to router mode.
Step 3:
Using the TP-Link Tether app or router’s Web UI configure the router using Dynamic IP as your WAN type.
Is this faq useful?
Your feedback helps improve this site.
TP-Link Community
Still need help? Search for answers, ask questions, and get help from TP-Link experts and other users around the world.


