How to view Tapo camera on PC/NAS/NVR through RTSP/Onvif Protocol
The Tapo wired camera supports the RTSP and ONVIF (Profile S) protocols, enabling compatibility with third-party NVR or NAS devices that also support RTSP/ONVIF.
This article will show you how to connect the Tapo camera to your NVR/NAS or a third-party client on PC like VLC Player and iSpy.
Important Notes:
1. For battery cameras/doorbells, only the special models (Tapo D235/D225/TD25) support RTSP streaming when hardwired, with a jumper cable installed, and the always-on mode turned on. Other models (such as Tapo C410/C420/C425/D230) do not support RTSP streaming due to battery and electronic design limitations.
2. It is not recommended to use this function on public networks. Only use it on trusted local networks and ensure that the Wi-Fi is encrypted.
3. Tapo Care cloud storage cannot be used simultaneously with NVR or a microSD card due to the limited number of streams supported by some models. If all three are used at the same time, recording on the NVR will be disabled. To restart recording on the NVR, remove the microSD card from the camera.
Before you start:
1. Before using this function, you need to create a camera account on the Tapo app. Set a highly secure and complex username and password that is different from your Tapo account password.
2. When adding the camera to an NVR or other third-party device, you will need the camera’s IP address. The IP address is usually assigned by your host router. You can find it on your host router’s DHCP list or in the Tapo app (go to the Device Settings page of the camera and tap Device Info to see its IP). For detailed instructions, please refer to the guide on how to find the IP address of your Tapo & Kasa cameras.
3. Ensure that the computer, NAS, NVR, and your camera are all connected to the same network or that they can access the public IP and port of your camera.
Step 1: Create a camera account in the Tapo app
1. On the Home page, tap on your camera model card to go to the camera Live View page (or you can click on Cameras tab>tap Manage on your camera model to go to the Live View page).

2. On the Live View page, tap the icon at the top right corner to enter the Device Settings page.

3. Tap Advanced Settings, then select Camera Account to create an account (username and password) for camera login on other portals.


You will see a prompt like below (About Camera Account), please read it and tap Understand and Agree to Use, then you can create an account for the camera.
Note: The username and password should contain 6 to 32 characters.


Step 2: Add your Tapo camera on PC/NAS/NVR
ONVIF (Open Network Video Interface Forum) and RTSP (Real-Time Streaming Protocol) are two commonly used protocols in video surveillance and streaming.
The Tapo camera can transmit real-time audio and video streams via the RTSP protocol. Additionally, if your PC, NAS, or NVR supports ONVIF, it can provide extra camera management features such as PTZ (pan-tilt-zoom) control.
Option 1: Using RTSP + ONVIF Protocol (using iSpy as an example)
1. Run the iSpy software on your computer.
2. Click Add on the top left menu and select ONVIF Camera.

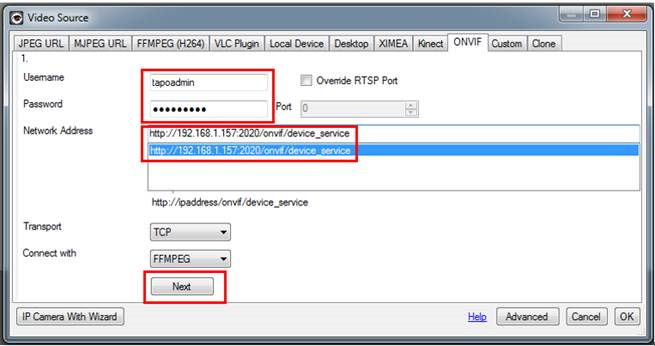
3. Enter the Username and Password that you set for your camera on the pop-up window, select Network Address, and click Next. You can customize other parameters if needed.
4. Choose the video resolution and click OK.

5. Customize the camera settings as needed, including Microphone, Talk, Motion Detection, Alerts, Recording, Images, Scheduling, and Storage. You can also change all the settings later. Click Finish to complete adding your camera to iSpy.

6. After adding your Tapo camera to iSpy, you can monitor and manage it using the app. View the live, customize motion detection, check the recordings when motion detected, set recording schedules, record videos and more.

Option 2: Using RTSP Protocol Only (using VLC as an example)

- Open the VLC software, select Media > Open Network Stream
- Fill in the URL of the Tapo camera

The URL of the RTSP live stream for the Tapo cameras will be:
For high quality stream1: rtsp://IP Address/stream1
For low quality stream2: rtsp:// IP Address/stream2
In some software, the URL need to add the port to access live stream, the default port is 554:
For high quality stream1: rtsp://IP Address:554/stream1
For low quality stream2: rtsp:// IP Address:554/stream2
If you fail to stream the Tapo camera via the RTSP/ONVIF protocol, you may refer to the article for the troubleshooting:
https://community.tp-link.com/en/smart-home/forum/topic/652710
Frequently Asked Questions
Q1: How can I view the live stream of the Tapo camera remotely from another network?
You can set up a VPN network or use your router's port forwarding feature to allow external devices to access the public IP and reach the camera. However, please note that the RTSP/ONVIF protocols are not highly secure, so it is not advisable to expose the camera to a public IP via port forwarding for long periods. It is recommended to use a secure, encrypted VPN network.
Q2:What ports are used by the Tapo camera for RTSP/ONVIF?
The Tapo camera uses the following ports for RTSP/ONVIF: ONVIF Service Port: 2020 and RTSP Service Port: 554
Q3:Why is the resolution of RTSP Stream 1 lower than the camera's maximum resolution?
For some models, like the C310, the resolution of Stream 1 (rtsp://IP Address/stream1) is determined by the video quality setting in the Tapo app. If you find that the resolution of Stream 1 is lower than the camera's maximum supported resolution, try changing the video quality setting to "Best Quality" in the Tapo app.
Q4:What should I do if there is no or very little sound when watching the live stream using RTSP/ONVIF?
If you find that there is no or very little sound when using RTSP/ONVIF to watch the live stream, please adjust the camera microphone settings in the Tapo app.
Q5:Does the Tapo Camera support 2-way audio when connected via RTSP/ONVIF?
The ONVIF standard includes multiple profiles, and the Tapo Camera only supports Profile S. This profile does not include 2-way audio. Profile S only covers basic functionalities such as video/audio streaming, network configuration, event handling, and PTZ (pan-tilt-zoom) control.
Is this faq useful?
Your feedback helps improve this site.


TP-Link Community
Still need help? Search for answers, ask questions, and get help from TP-Link experts and other users around the world.