How to Use the TD-W8960N/TD-W8968_V3V4 Wireless Bridge (WDS) Function with another TD-W8960N/TD-W8968_V3V4/TD-W8950ND(V2)/TD-W8950N
A Wireless Distribution System (WDS) is a system that enables the wireless interconnection of access points in an IEEE 802.11 network. It allows a wireless network to be expanded using multiple access points without the need for a wired backbone to link them. The following is a simple SOHO solution guide about WDS.
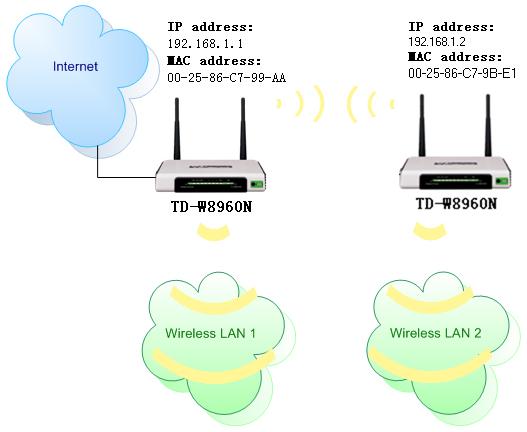
As an example, we define the TD-W8960N that connecting to the Internet as the main TD-W8960N, and the other one as secondary TD-W8960N.
Please follow the instructions to configure them.
Part 1: configure the Main TD-W8960N
Step 1 Log into TD-W8960N’s management page. If you are not sure about how to do this, please click here.
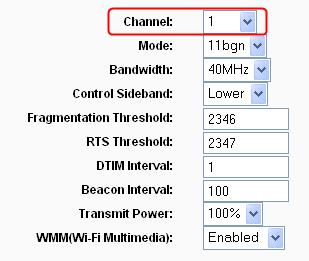
Step 2 On the left-side menu, click Wireless -> Advanced, and please change the channel of the wireless network. In my example, the channel is set to 1. Remember Apply/Save the settings.
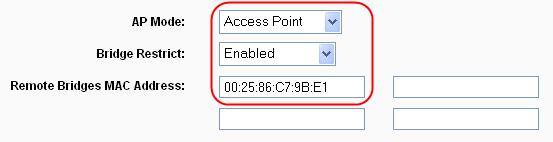
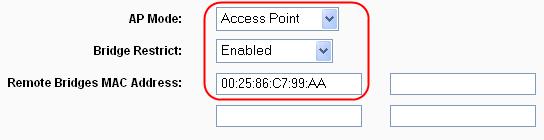
Step 3 On the left-side menu, click Wireless -> Wireless Bridge, and the AP mode should be Access Point, the Bridge Restrict is Enabled. And please fill in the MAC address of the secondary TD-W8960N. If you don’t know, you can find it on the label, sticking on of the bottom of the TD-W8960N.
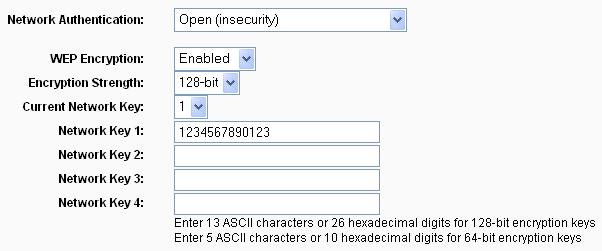
Step 4 Since the WDS on the TD-W8960N only supports Open or Shared Network Authentication, you need to change the wireless security on the TD-W8960N. Go to Wireless -> Security and change the security settings according to your demands.
Part 2: Configure the Secondary TD-W8960N
Step 1 Log into the Secondary TD-W8960N.
Step 2 On the left-side menu, click Wireless -> Advanced, and please change the channel of the wireless network. Here the channel is set to 1. Remember Apply/Save the settings.
Step 3 On the left-side menu, click Wireless -> Wireless Bridge, and the AP mode should be Access Point, the Bridge Restrict is Enabled. And please fill in the MAC address of the main TD-W8960N. If you don’t know, you can find it on the label, sticking on of the bottom of the TD-W8960N.
Step 4 Go to Wireless -> Security and change the security settings according to the main TD-W8960N.
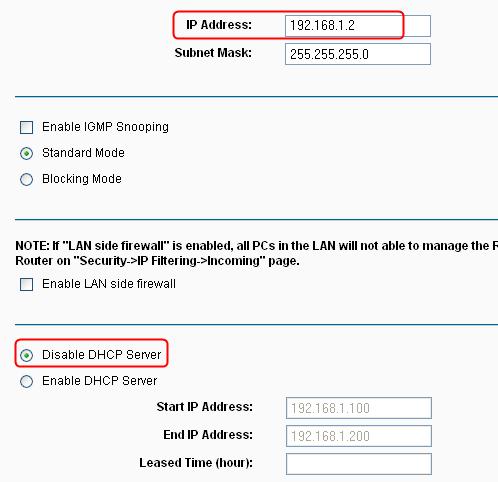
Step 5 On the left-side menu, click Advanced Setup -> LAN, please change the LAN IP to 192.168.1.2, and Disable the DHCP Server function. Click Save/Apply to reboot the modem.
Here until, all settings required by WDS function is completed. You can make a simple check by the Ping utility. If the ping proceeds successfully (which means the WDS performs properly), you will see the similar screen as below:

Get to know more details of each function and configuration please go to Download Center to download the manual of your product.
Bu SSS faydalı mı?
Your feedback helps improve this site.

