How to set up DDNS (NO-IP) of TP-Link Wireless Dual Band 4G LTE Router (new logo)

Archer MR200( V2 V3 V4 ) , Archer MR500 , Archer MR202 , Archer MR400( V1 V2 V3 ) , Archer MR402 , Archer MR600( V1 ) , Archer MR515 , Archer MR505
Recent updates may have expanded access to feature(s) discussed in this FAQ. Visit your product's support page, select the correct hardware version for your device, and check either the Datasheet or the firmware section for the latest improvements added to your product. Please note that product availability varies by region, and certain models may not be available in your region.
Most ISPs (Internet service providers) assign a dynamic IP address to the router and you can use this IP address to access your router remotely. However, the IP address can change any time and you don’t know when it changes. In this case, you might need the DDNS (Dynamic Domain Name Server) feature on the router to allow you and your friends to access your router and local servers (FTP, HTTP, etc.) using domain name, in no need of checking and remembering the IP address.
Note: DDNS does not work if the ISP assigns a private WAN IP address (such as 192.168.1.x) to the router.
Here takes Archer MR200 as demonstration.
Step 1
Please refer to How to log into the web-based management interface of TP-Link Wireless Dual Band 4G LTE Router? (new logo)
Step 2
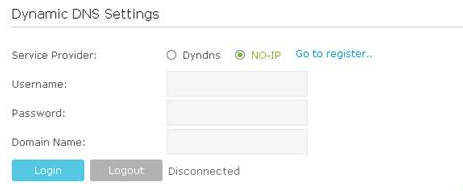
Go to Advanced > Network> Dynamic DNS. Select the DDNS service provider NO-IP.
If you DO have account from http://www.no-ip.com, please skip to Step 10. Otherwise, please follow the next steps for how to create account.
Step 3
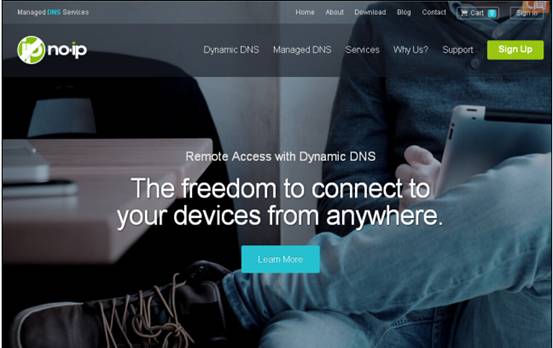
Click on Go to register and you will be redirected to http://www.noip.com,
It will open the home page of NO-ip.
Step 4
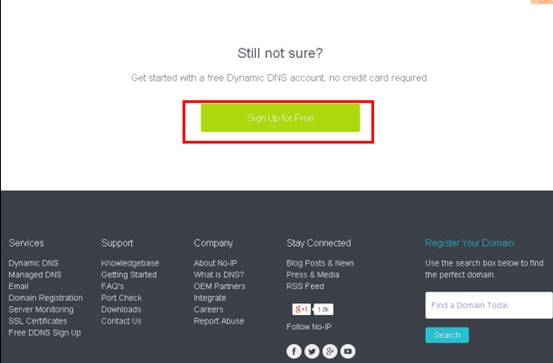
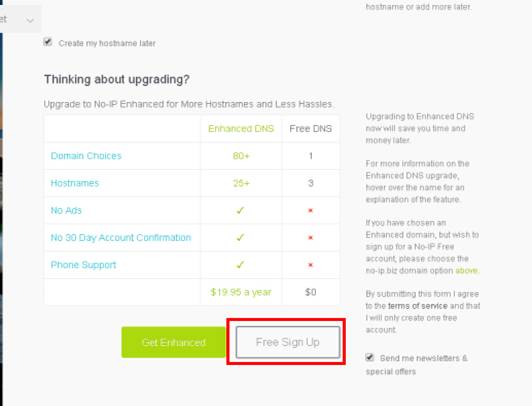
Scroll down this home page to the very bottom and click Sign Up for Free
Step 5
Type in the required information (Username, Email, and Password) to create a new account.
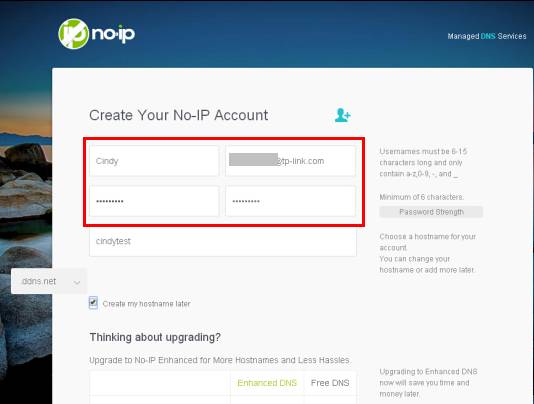
Then click Free Sign Up at the bottom of this page.
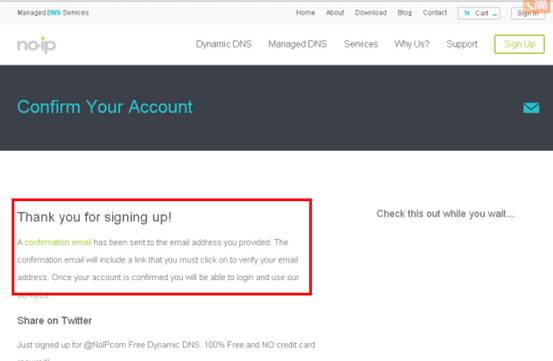
Step 6
No-IP will send a confirmation mail to your email box which contains an activation link. Go to your mail box and check the mail.
Step 7
After click the activation link you will be able to login with your username and password.
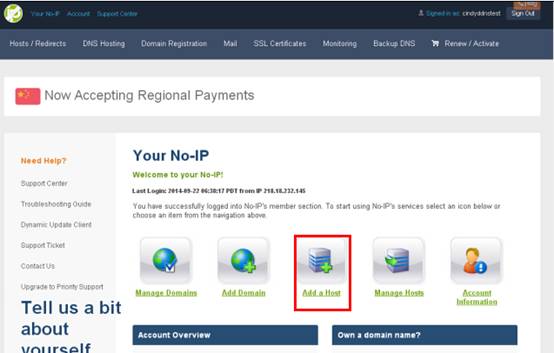
Step 8
After login, please choose Add a Host.
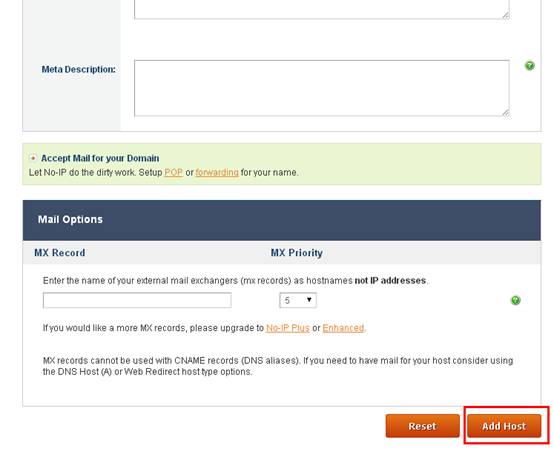
Step 9
You can then choose a free DDNS domain you like from the drop-down list. For example you can choose ddns.net. Then create a Hostname for the DDNS.
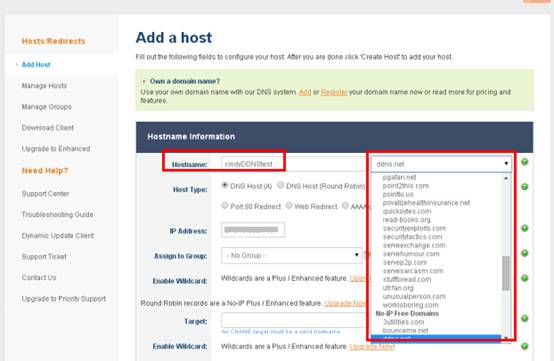
Then scroll down this page and click Add Host
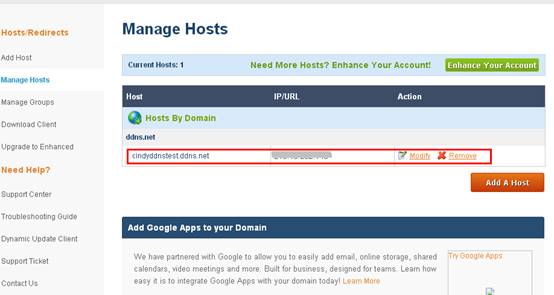
You will see the created host in the list
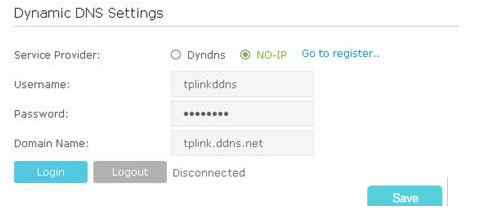
Enter the Username, Password and Domain Name you created on NO-IP website and click Login button and click Save.
Tips:
If you want to use a new DDNS account, please log out first, then log in with the new account.
Get to know more details of each function and configuration please go to Download Center to download the manual of your product.
Is this faq useful?
Your feedback helps improve this site.
What’s your concern with this article?
- Dissatisfied with product
- Too Complicated
- Confusing Title
- Does not apply to me
- Too Vague
- Other
Thank you
We appreciate your feedback.
Click here to contact TP-Link technical support.
This website uses cookies to improve website navigation, analyze online activities and have the best possible user experience on our website. You can object to the use of cookies at any time. You can find more information in our privacy policy . Don’t show again
Standaard Cookies
Deze cookies zijn noodzakelijk voor de werking van de website en kunnen niet worden uitgeschakeld.
TP-Link
accepted_local_switcher, tp_privacy_base, tp_privacy_marketing, tp_smb-select-product_scence, tp_smb-select-product_scenceSimple, tp_smb-select-product_userChoice, tp_smb-select-product_userChoiceSimple, tp_smb-select-product_userInfo, tp_smb-select-product_userInfoSimple, tp_top-banner, tp_popup-bottom, tp_popup-center, tp_popup-right-middle, tp_popup-right-bottom, tp_productCategoryType
Live-Chat
__livechat, __lc2_cid, __lc2_cst, __lc_cid, __lc_cst, CASID
Youtube
id, VISITOR_INFO1_LIVE, LOGIN_INFO, SIDCC, SAPISID, APISID, SSID, SID, YSC, __Secure-1PSID, __Secure-1PAPISID, __Secure-1PSIDCC, __Secure-3PSID, __Secure-3PAPISID, __Secure-3PSIDCC, 1P_JAR, AEC, NID, OTZ
Analyse en Marketing Cookies
Cookies voor analyse geven ons de mogelijkheid uw activiteiten op onze website te volgen en zo de functionaliteit van de website aan te passen en te verbeteren.
Marketing cookies kunnen op onze website worden geplaatst door externe adverteerders waar wij mee samenwerken om een profiel te creëren met uw interesses en u zo van relevante advertenties te kunnen voorzien op andere websites.
Google Analytics & Google Tag Manager
_gid, _ga_<container-id>, _ga, _gat_gtag_<container-id>
Google Ads & DoubleClick
test_cookie, _gcl_au
Meta Pixel
_fbp
Crazy Egg
cebsp_, _ce.s, _ce.clock_data, _ce.clock_event, cebs
lidc, AnalyticsSyncHistory, UserMatchHistory, bcookie, li_sugr, ln_or