How to View VIGI Camera on PC Through RTSP Stream

VIGI C400HP , VIGI C340HPWSM , VIGI C540HPWSM , InSight S345-4G , VIGI C540V , VIGI C540S , VIGI C250 , VIGI C450 , VIGI C330 , VIGI C330I , VIGI C455 , VIGI C440HWSM-W4 , VIGI C230I Mini , VIGI C580-W , InSight S655I , VIGI C340 , VIGI C540-4G , VIGI C340-W , VIGI C540 , VIGI C385 , VIGI C420 , VIGI C430I , VIGI C220I , VIGI C240I , VIGI C440-W , VIGI C540HWSM-W4 , InSight S445ZI , VIGI C340S , VIGI NK4P-T4425-2T , VIGI C540-W , VIGI C230 , VIGI C350 , VIGI C300P , VIGI C430 , VIGI C355 , InSight S345ZI , VIGI C320I , VIGI C340I , VIGI C580-4G , VIGI C420I , InSight S245ZI , VIGI C340HWSM-W4 , EasyCam C320 , VIGI C300HP , VIGI C340 (VIGI C340HPWSM) , VIGI C240 , VIGI C485 , VIGI C400P , VIGI C440 , VIGI C440I , VIGI C445 , VIGI C230I
Recent updates may have expanded access to feature(s) discussed in this FAQ. Visit your product's support page, select the correct hardware version for your device, and check either the Datasheet or the firmware section for the latest improvements added to your product. Please note that product availability varies by region, and certain models may not be available in your region.
The VIGI camera supports the RTSP protocol, so it can work with third-party NVR or NAS devices that also support the RTSP protocol. If a user wants to view the live stream of the camera with a third-party app like VLC Player, he will just need to input the URL of the RTSP stream on the VLC Player app.
The URL of the RTSP live stream for the VIGI cameras will be:
For high quality stream1: rtsp://IP Address/stream1
For low quality stream2: rtsp:// IP Address/stream2
Notes:
1. The username/password is the camera account that you created via the VIGI app.
2. The IP address is the camera’s IP address assigned by your host router. You can find it on your host router’s DHCP list or in the VIGI app (Go to Camera Settings and navigate to the camera details page).
3. If you want to view the live stream of the VIGI camera with a third-party app remotely, you will need to open port 554 for the camera on your host router first.
4. You could also use ONVIF standards to add the VIGI camera with its username/password and IP address.
Apart from the VIGI app, VIGI cameras can work with other third-party software to use and manage your VIGI camera.
Note: Before you start, make sure the computer and your camera are connecting to the same network.
Step 1: Confirm your access to the camera
Make sure that you have access to your camera by Username and Password which you created at the very beginning of the setup.
Step 2: Add your VIGI camera on iSpy
1. Run the iSpy software on your computer.
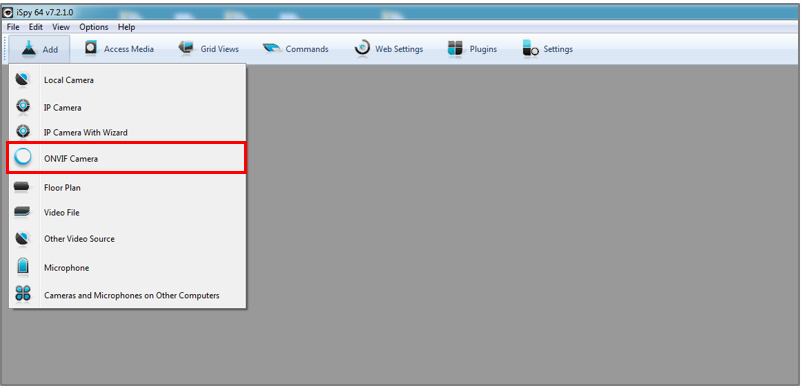
2. Click Add on the top left menu and select ONVIF Camera.
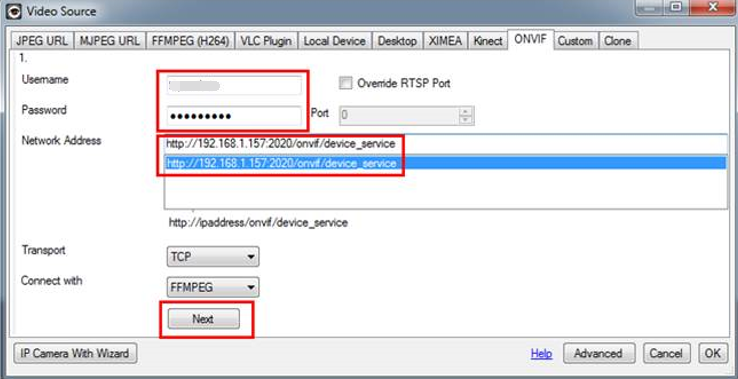
3. Enter the Username and Password that you set for your camera on the pop-up window, select Network Address, and click Next. You can customize other parameters if needed.
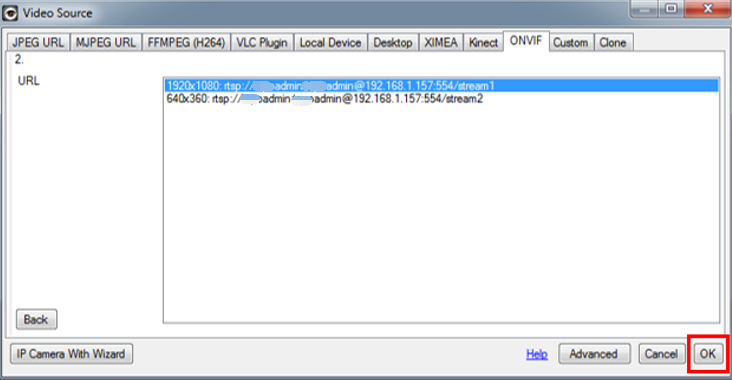
4. Choose the video resolution and click OK.
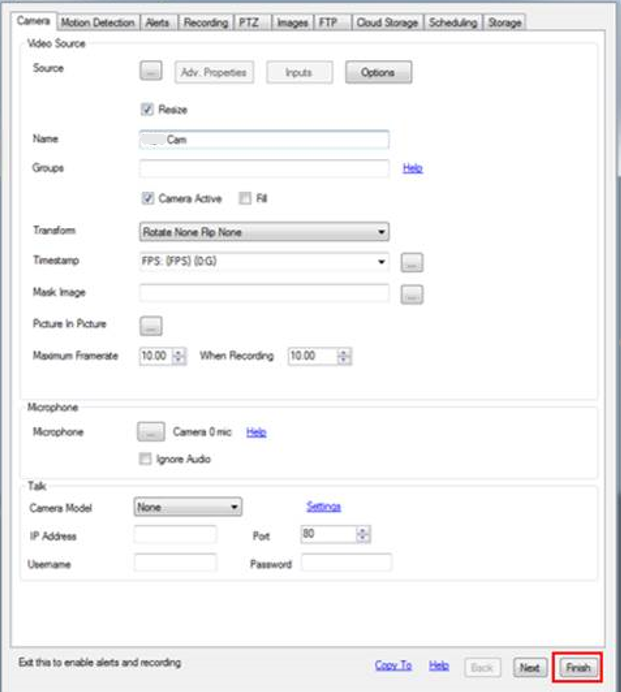
5. Customize the camera settings as needed, including Microphone, Talk, Motion Detection, Alerts, Recording, Images, Scheduling, and Storage. You can also change all the settings later. Click Finish to complete adding your camera to iSpy.
6. After adding your VIGI camera to iSpy, you can monitor and manage it using the app. View the live, customize motion detection, check the recordings when motion detected, set recording schedules, record videos and more.
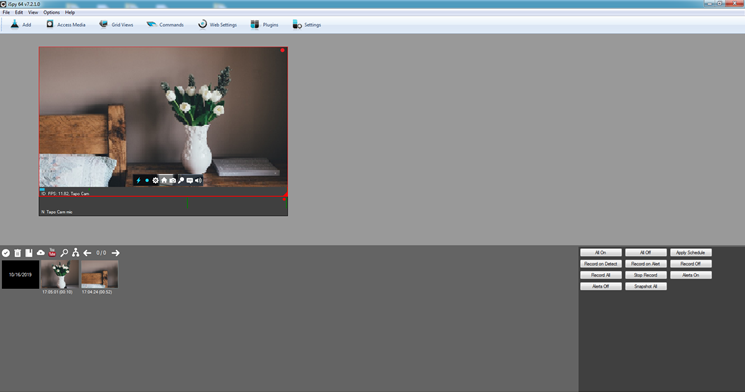
To get to know more details of each function and configuration please go to Download Center to download the manual of your product.
¿Es útil esta pregunta frecuente?
Sus comentarios nos ayudan a mejorar este sitio.
What’s your concern with this article?
- Dissatisfied with product
- Too Complicated
- Confusing Title
- Does not apply to me
- Too Vague
- Other
Gracias
Agradecemos sus comentarios.
Haga clic aquí para comunicarse con el soporte técnico de TP-Link.
Este sitio web utiliza cookies para mejorar la navegación en el sitio web, analizar las actividades en línea y tener la mejor experiencia de usuario posible en nuestro sitio web. Puedes oponerte al uso de cookies en cualquier momento. Puede encontrar más información en nuestra política de privacidad . No volver a mostrar
Basic Cookies
These cookies are necessary for the website to function and cannot be deactivated in your systems.
TP-Link
accepted_local_switcher, tp_privacy_base, tp_privacy_marketing, tp_smb-select-product_scence, tp_smb-select-product_scenceSimple, tp_smb-select-product_userChoice, tp_smb-select-product_userChoiceSimple, tp_smb-select-product_userInfo, tp_smb-select-product_userInfoSimple, tp_top-banner, tp_popup-bottom, tp_popup-center, tp_popup-right-middle, tp_popup-right-bottom, tp_productCategoryType
Livechat
__livechat, __lc2_cid, __lc2_cst, __lc_cid, __lc_cst, CASID
Youtube
id, VISITOR_INFO1_LIVE, LOGIN_INFO, SIDCC, SAPISID, APISID, SSID, SID, YSC, __Secure-1PSID, __Secure-1PAPISID, __Secure-1PSIDCC, __Secure-3PSID, __Secure-3PAPISID, __Secure-3PSIDCC, 1P_JAR, AEC, NID, OTZ
Analysis and Marketing Cookies
Analysis cookies enable us to analyze your activities on our website in order to improve and adapt the functionality of our website.
The marketing cookies can be set through our website by our advertising partners in order to create a profile of your interests and to show you relevant advertisements on other websites.
Google Analytics & Google Tag Manager
_gid, _ga_<container-id>, _ga, _gat_gtag_<container-id>
Google Ads & DoubleClick
test_cookie, _gcl_au
Meta Pixel
_fbp
Crazy Egg
cebsp_, _ce.s, _ce.clock_data, _ce.clock_event, cebs
lidc, AnalyticsSyncHistory, UserMatchHistory, bcookie, li_sugr, ln_or