How to configure RSTP on TP-Link switches using the old GUI

TL-SG2452 , T1500G-10PS , TL-SL2210 , TL-SL2452 , TL-SG3424 , TL-SG2216 , TL-SG2424P , TL-SG5428 , TL-SG2210P , T2700G-28TQ , TL-SG5412F , T1500G-10MPS , TL-SG3424P , SG2210P , S4500-8G , TL-SL3428 , TL-SL2218 , TL-SL3452 , TL-SG2424 , TL-SG3216 , TL-SL5428E , TL-SG2008 , TL-SG3210 , SG3210 , Festa FS310GP , TL-SL2428 , T3700G-28TQ , T1500G-8T
Recent updates may have expanded access to feature(s) discussed in this FAQ. Visit your product's support page, select the correct hardware version for your device, and check either the Datasheet or the firmware section for the latest improvements added to your product. Please note that product availability varies by region, and certain models may not be available in your region.
STP (Spanning Tree Protocol), subject to IEEE 802.1D standard, is aimed at disbranching a ring network in the Data Link layer of local area network. Devices running STP can discover loops in the network and block ports by exchanging information. Then a ring network can be disbranched to form a tree-topological no ring network to prevent broadcast storm. RSTP refers to deliver a very fast way to convergence.
Now let’s learn how to configure RSTP on TP-Link Switches by the following example:
Network Topology:
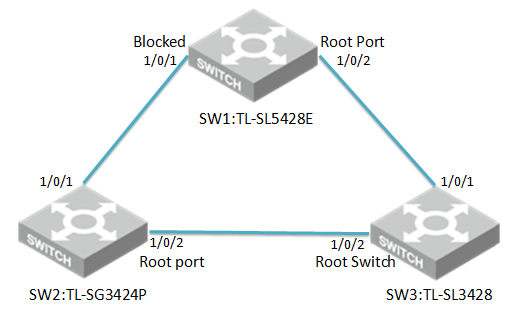
Three switches are under the same VLAN
Attention:
- Please configure the RSTP of switches first and then connect them together to avoid the broadcast storm.
- In this test we will let three switches elect root switch automatically. If you want to set a specific switch as root switch, please set CIST priority number of the switch smallest among three.
Here we take TL-SG3424P、TL-SL5428E and TL-SL3428 as an example.
The connection of three switches shows as the topology.
Configuration steps:
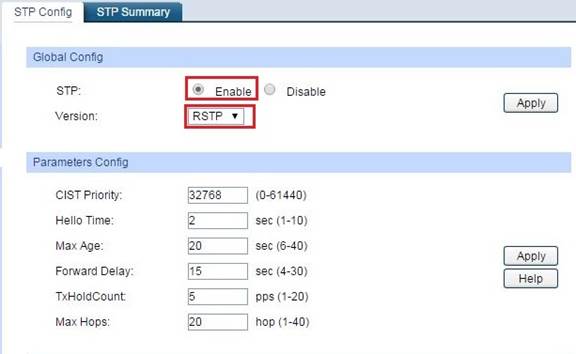
- Choose the menu Spanning Tree→STP Config→STP Config to load the following page, Enable STP and select version RSTP on Three switches.
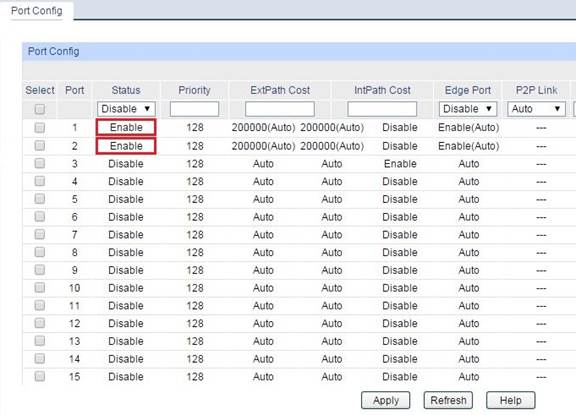
2. Choose the menu Spanning Tree →Port Config and Enable the
Up-link port status on TL-SG3424P、TL-SL3428 and TL-SL5428E.
The Up-link port is the port which connected to other switches.
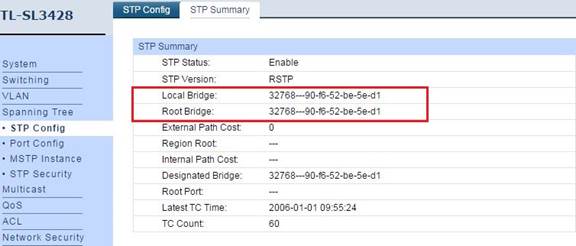
3. Then we can see three switches elected the root switch TL-SL3428 via RSTP through menu Spanning Tree→STP Config→STP Summary.
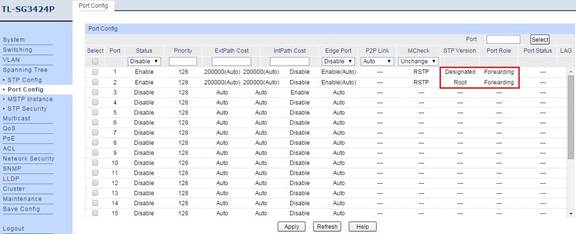
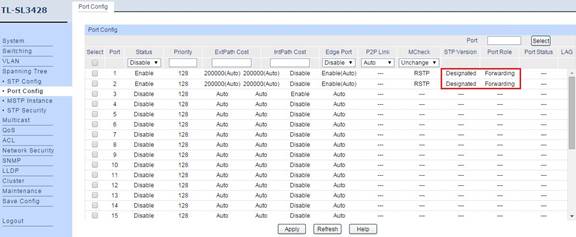
4. We can see the STP version and port role on three switches.
TL-SG3424P
TL-SL3428
TL-SL5428E
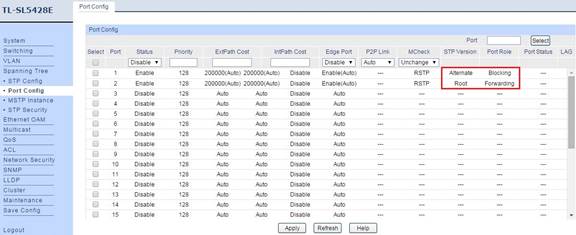
5. Now we can make clear which port was blocked via RSTP. From the port role we can see port 1 of TL-5428E was blocked.
So the finally topology is the following:
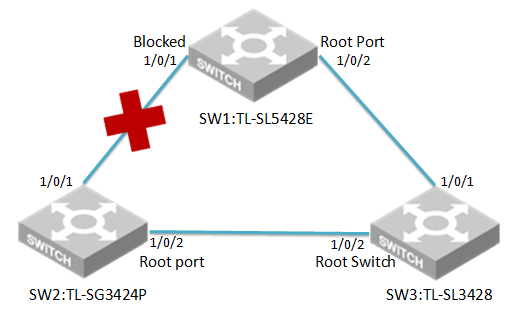
Finally, the network will work normally.
Questa faq è utile?
Your feedback helps improve this site.
What’s your concern with this article?
- Dissatisfied with product
- Too Complicated
- Confusing Title
- Does not apply to me
- Too Vague
- Other
Grazie
We appreciate your feedback.
Click here to contact TP-Link technical support.
Questo sito utilizza i cookies per migliorare l'esperienza di navigazione, analizzare le attività online e offrire agli utenti una migliore user experience. Puoi disattivare o rifiutare il loro utilizzo in qualunque momento. Per maggiori informazioni consulta la nostra privacy policy .
Basic Cookies
Questi cookies sono necessari per il corretto funzionamento del sito e non possono essere disattivati nel tuo sistema.
TP-Link
accepted_local_switcher, tp_privacy_base, tp_privacy_marketing, tp_smb-select-product_scence, tp_smb-select-product_scenceSimple, tp_smb-select-product_userChoice, tp_smb-select-product_userChoiceSimple, tp_smb-select-product_userInfo, tp_smb-select-product_userInfoSimple, tp_top-banner, tp_popup-bottom, tp_popup-center, tp_popup-right-middle, tp_popup-right-bottom, tp_productCategoryType
Livechat
__livechat, __lc2_cid, __lc2_cst, __lc_cid, __lc_cst, CASID
Youtube
id, VISITOR_INFO1_LIVE, LOGIN_INFO, SIDCC, SAPISID, APISID, SSID, SID, YSC, __Secure-1PSID, __Secure-1PAPISID, __Secure-1PSIDCC, __Secure-3PSID, __Secure-3PAPISID, __Secure-3PSIDCC, 1P_JAR, AEC, NID, OTZ
Analytics e Marketing Cookies
I cookies analitici ci permettono di analizzare le tue attività sul nostro sito allo scopo di migliorarne le funzionalità.
I marketing cookies possono essere impostati sul nostro sito dai nostri partner pubblicitari allo scopo di creare un profilo di tuo interesse e proporti contenuti pubblicitari rilevanti su altri siti.
Google Analytics & Google Tag Manager
_gid, _ga_<container-id>, _ga, _gat_gtag_<container-id>
Google Ads & DoubleClick
test_cookie, _gcl_au
Meta Pixel
_fbp
Crazy Egg
cebsp_, _ce.s, _ce.clock_data, _ce.clock_event, cebs
lidc, AnalyticsSyncHistory, UserMatchHistory, bcookie, li_sugr, ln_or