How to enter the BootUtil Menu to factory reset the switch with the console cable

S5500-8MHP2XF , TL-SG3428MP , T3700G-52TQ , SX3008F , SG3428MP , SG3428X , T2600G-52TS , SG3452P , T2600G-18TS , T2600G-28SQ , TL-SG3210 , TL-SG3452 , SG3210 , SG3452 , TL-SX3008F , TL-SG3210XHP-M2 , S5500-24GP4XF , TL-SG3428 , SG3428XMP , SG3428 , TL-SG3452P , TL-SG3428XMP , TL-SG3428X , T3700G-28TQ
Recent updates may have expanded access to feature(s) discussed in this FAQ. Visit your product's support page, select the correct hardware version for your device, and check either the Datasheet or the firmware section for the latest improvements added to your product. Please note that product availability varies by region, and certain models may not be available in your region.
TP-Link BootUtil menu enables some advanced features, such as activating the backup image, recovering the password, and factory resetting. If you forget the username or password, you can access the menu to recover the password or directly reset the switch, with the RJ45 console cable or Micro-USB console cable. In this article, we will share how to reset the switch with the BootUtil menu and Micro-USB cable.
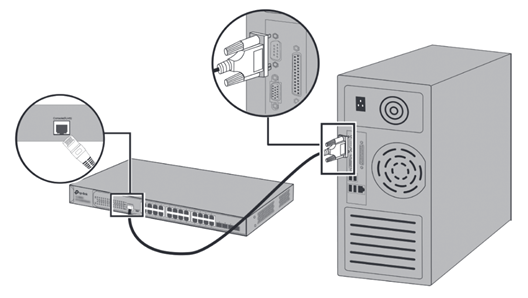
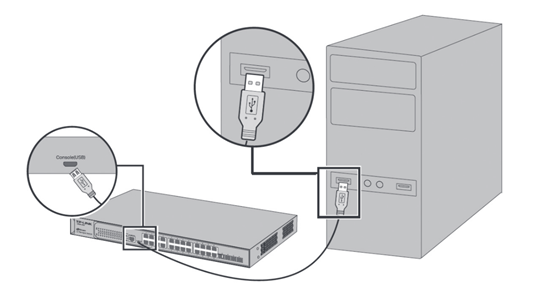
Step 1. Connect your computer to the switch.
If your computer has a serial port (COM), please connect it to the console port (RJ45) of the switch, with the RJ45 console cable.
If you only have USB ports on your computer, you can get a USB-to-RS232 cable. You may need to install the RS232 driver for the cable, which is provided by your cable vendor.
You can also choose a Micro-USB cable that supports data transfer to connect your computer to the switch. Then for Windows computers, please click here to download and install the TP-Link USB Console Driver then continue. For Mac, please follow FAQ 3177.
Note: Compared with the RJ45 Console cable and USB-to-RS232 cable, it might be more difficult to enter the BootUtil with a Micro-USB cable. If you still cannot enter the BootUtil after several attempts, you may get a USB-to-RS232 cable.
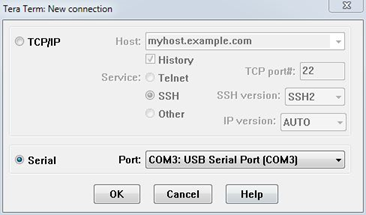
Step 2. Install a Terminal Emulator.
If you use the console cable, you can choose the Terminal Emulator according to your custom.
Here we use the Micro-USB cable, some emulators, such as Putty or HyperTerminal, cannot support entering the BootUtil menu. We recommend “Tera Term”, which you can download and install from the official website: https://teratermproject.github.io/index-en.html
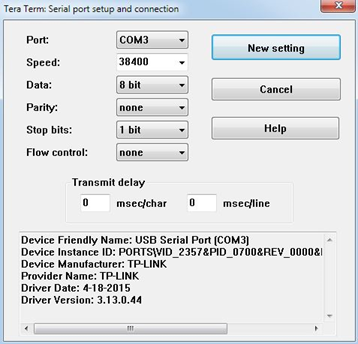
Step 3. Set parameters for console connection.
Run Tera Term or other emulators, choose the correct COM port.
Set the connection parameters as below (for Tera Term, please go to Setup --- Serial Port).
Step 4. Power On the switch to enter the BootUtil menu.
Power on the switch and keep clicking the keyboard to stop autoboot, then you will enter the BootUtil menu.
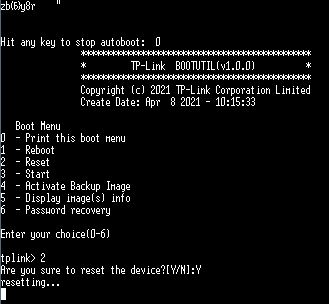
Enter the number of the corresponding feature.
To factory reset the switch, type 2 then enter.
To recover the password, type 6 then enter.
Related Articles:
What is the Console Cable and the line sequence of it?
Looking for More
Ez a GY.I.K. hasznos volt?
Véleménye segíti az oldal fejlesztését
What’s your concern with this article?
- Dissatisfied with product
- Too Complicated
- Confusing Title
- Does not apply to me
- Too Vague
- Other
Thank you
We appreciate your feedback.
Click here to contact TP-Link technical support.
Ez a weboldal cookie -kat használ a weboldal navigációjának javítása, az online tevékenységek elemzése és a felhasználók számára a legjobb élmény biztosítása érdekében. A cookie -k használata ellen bármikor tiltakozhat. További információt az adatvédelmi irányelveinkben talál.
Alap Cookie-k
Ezek a cookie -k a webhely működéséhez szükségesek, és nem tilthatók le a rendszereiben.
TP-Link
accepted_local_switcher, tp_privacy_base, tp_privacy_marketing, tp_smb-select-product_scence, tp_smb-select-product_scenceSimple, tp_smb-select-product_userChoice, tp_smb-select-product_userChoiceSimple, tp_smb-select-product_userInfo, tp_smb-select-product_userInfoSimple, tp_top-banner, tp_popup-bottom, tp_popup-center, tp_popup-right-middle, tp_popup-right-bottom, tp_productCategoryType
Live-Chat
__livechat, __lc2_cid, __lc2_cst, __lc_cid, __lc_cst, CASID
Youtube
id, VISITOR_INFO1_LIVE, LOGIN_INFO, SIDCC, SAPISID, APISID, SSID, SID, YSC, __Secure-1PSID, __Secure-1PAPISID, __Secure-1PSIDCC, __Secure-3PSID, __Secure-3PAPISID, __Secure-3PSIDCC, 1P_JAR, AEC, NID, OTZ
Marketing és Elemző Cookie-k
Az elemző cookie -k lehetővé teszik számunkra, hogy elemezzük weboldalunkon végzett tevékenységeit, hogy javítsuk és módosítsuk webhelyünk működését.
Hirdetési partnereink a weboldalunkon keresztül marketing cookie -kat állíthatnak be annak érdekében, hogy érdeklődési körének profilját, és hogy releváns hirdetéseket jelenítsen meg más webhelyeken.
Google Analytics & Google Tag Manager
_gid, _ga_<container-id>, _ga, _gat_gtag_<container-id>
Google Ads & DoubleClick
test_cookie, _gcl_au
Meta Pixel
_fbp
Crazy Egg
cebsp_, _ce.s, _ce.clock_data, _ce.clock_event, cebs
lidc, AnalyticsSyncHistory, UserMatchHistory, bcookie, li_sugr, ln_or